09-03-2026 read time: 15 min.
Private Access Sensors

Hi! Welcome back to another post.
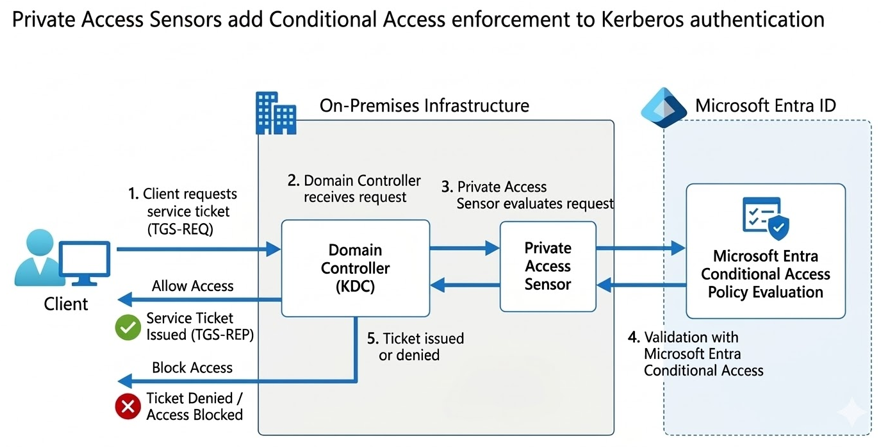
In this article we will explore Private Access Sensors, a powerful feature of Global Secure Access Private Access that adds Conditional Access enforcement to traditional Kerberos-based services.
We will look at:
- What Private Access Sensors do
- How they change Kerberos authentication flows
- How to implement them step-by-step
- Important considerations for a full Zero Trust deployment
Source: Microsoft Entra Community Blog
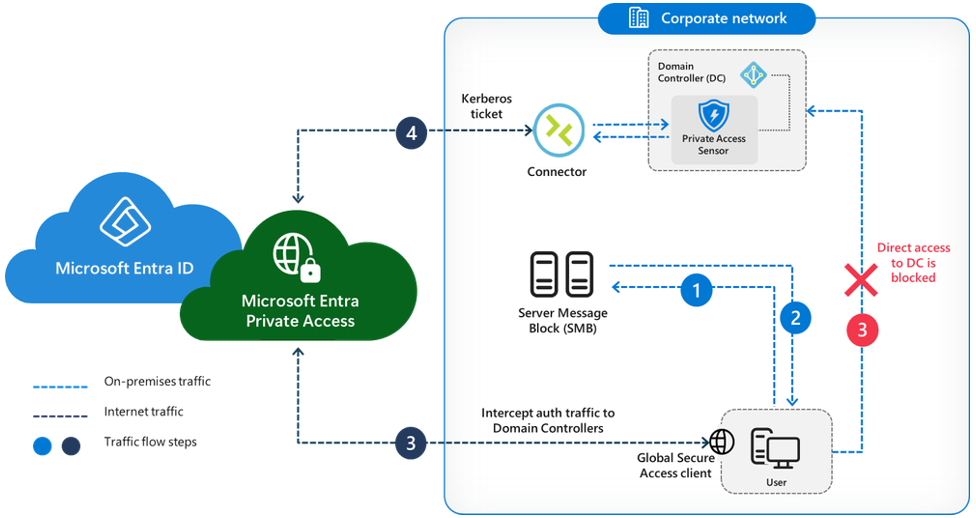
Let me first explain what the feature does. The best way to do this is to describe the way it works with and without the feature. For example take an SMB share and the connectivity to it.
Without Sensor
In normal circumstances, without the feature turned on, your client requests a CIFS service ticket from the domain controller. Because the user is already authenticated to Active Directory, the domain controller issues the CIFS service ticket without performing any additional security checks. You can connect to the SMB share and access it using that service ticket.
With Sensor
With the feature turned on, the handling of CIFS service tickets changes. In enforced mode, when the client requests a CIFS service ticket, the sensor recognizes the request for the server’s CIFS SPN. The sensor then contacts Microsoft Entra to verify whether the client satisfies the required Conditional Access policies, such as device compliance. If the checks are satisfied, the client receives the requested CIFS service ticket, which can then be used to access the SMB share.
Now we know how this feature works the next step is how do we implement this feature.
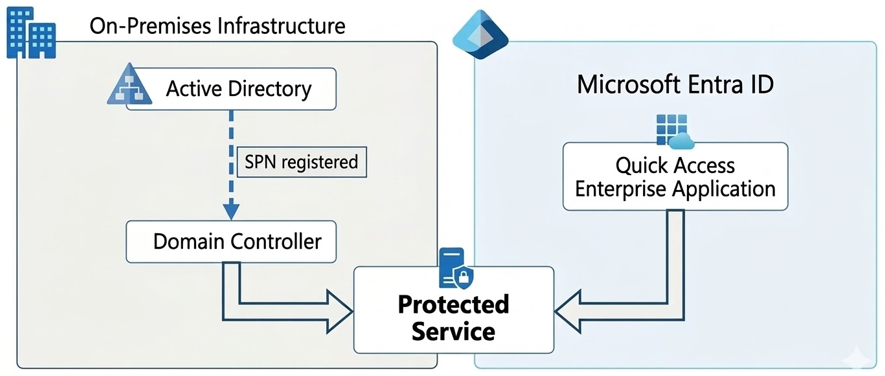
SPN RECORDS
SPN Records are required to be configured on both on premises and in Entra.
First let’s identify your existing SPN records. This can be done with the following commands:
- Find all SPN records in your domain: setspn -T yourdomain.com -Q */*
- Find the SPN records for a specific host: setspn -L SERVER01.yourdomain.com
If the SPN record for your specific service already exists, you can jump over to the next part of this tutorial.
I will not cover how to create SPN records for every available service but in the example below you can see how to create a CIFS SPN record for a SMB share.
To set a new CIFS SPN record you can use the following command:
- setspn -S CIFS/SERVER01.yourdomain.com SERVER01
If you made a mistake, you could delete an SPN record by using the following command:
- setspn -D CIFS/SERVER01.yourdomain.com SERVER01
Once you have created the SPN records you want to protect, we can jump over to configure them in the Entra Quick Access Enterprise Application.
Configuration in Microsoft Entra
First, navigate to the Service principal name menu in the Quick Access Enterprise Application which you can find in the Global Secure Access portal of Entra.
You can do this by completing the following steps:
- Open https://entra.microsoft.com/
- Open the Global Secure Access menu
- Open Applications
- Open the Quick Access application
- Click on Network access properties
- Click on Service principal name
Now that you have found the Service principal name menu in Entra we can create the SPN record we want to protect.
You can do this with the following steps:
- Click Add service principal name
- Enter the SPN records in the Service principal name field in the following format: CIFS/SERVER01.yourdomain.com
- Click Add
On-Premises Configuration
To make use of Private Access Sensors, you need to install the Private Access Sensor on all your domain controllers you host in your environment.
You can find the prerequisites of the sensor here: https://learn.microsoft.com/en-us/entra/global-secure-access/how-to-configure-domain-controllers#prerequisites
Installing the Private Access Sensor
The installer can be found at the following place:
- Open https://entra.microsoft.com/ >
- Open the Global Secure Access menu >
- Open Connect >
- Open Connectors and sensors >
- Click on the Private Access sensors tab >
- Click on Download private access sensor
Run the installer and register it with Microsoft Entra. After registering you can find the registered sensor back in the same tab as where you downloaded the installer.
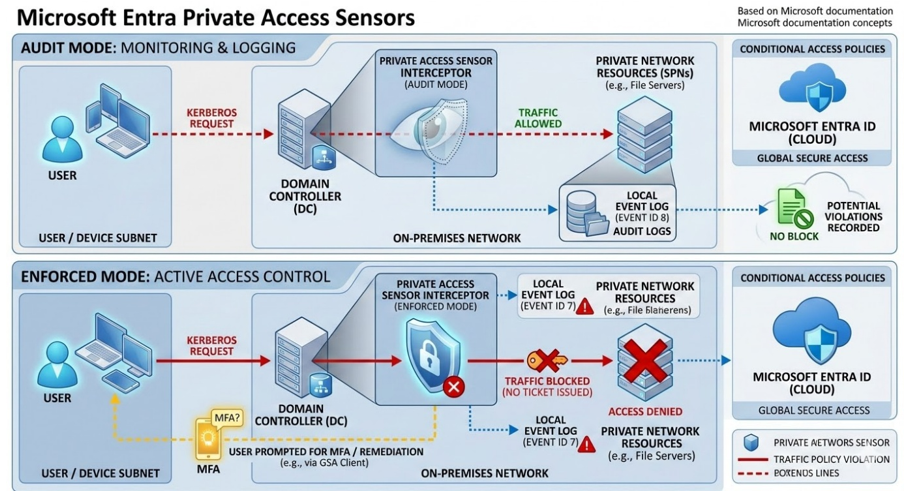
By default, the sensor will be installed in audit mode so nothing will happen yet, you still have some configuration to do to make everything work properly.
To change this to Enforce mode you can follow these steps:
- Open https://entra.microsoft.com/ >
- Open the Global Secure Access menu >
- Open Connect >
- Open Connectors and sensors >
- Click on the Private Access sensors tab >
- Click on the Private Access sensor >
- Click on the drop-down menu next to Sensor mode and choose for Enforce Mode >
- Click Save
Configuring the Sensor
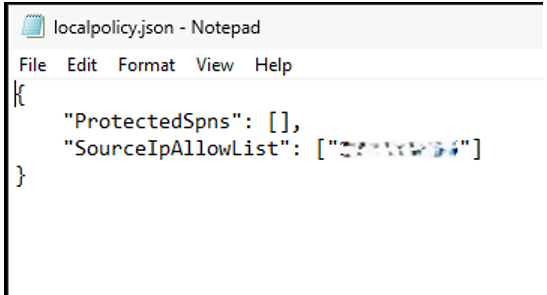
The first thing you need to do after installation is configure the local policy file (json) and add the Private Network connectors to the SourceIpAllowList.
This makes sure that only Kerberos requests from the connectors to the SPN records you register are allowed if no other exclusions have been made.
In the image below you can see that I have configured one IP address of my connector in this file, remember to put the IP address between quotes, otherwise it will not work.
Cloud Policy file
The cloud policy file (json) is where the configurations are made in the Entra portal are reflected in.
Please open this file and check if your SPN records you configured earlier are present there. Please do not edit this file!
Verifying the Deployment
To verify the deployment, you can check the Event Log where all the actions are being logged. You can find the event log here:
- Open Event Viewer >
- Application and Service Logs >
- Microsoft >
- Windows >
- Private Access Sensor >
- Global SecureAccess Provider Operational Channel
In the eventlog you will find several events which tell you what is happening with kerberos requests which are being sent to your domain controller.
The following events are the most important (I have used dummy variables):
- Event ID 1: Private Access Sensor service is starting.
- Event ID 2: Private Access Sensor Service started successfully in audit mode.
- Event ID 7: Kerberos request blocked. SPN: CIFS/SERVER01.yourdomain.com, Source IP: 10.10.10.20, UPN: user1@yourdomain.com, IsAuditMode: false, Entra Device Name: N/A, Entra Device ID: N/A, Entra User ID: N/A, Original Source IP: N/A, Reason: Request is blocked since traffic is not from connector and upn/sourceId not excluded
- Event ID 8: Kerberos request allowed. SPN: ldap/DC. yourdomain.com/yourdomain.com, Source IP: 10.10.10.10, UPN: MSOL_123456789@yourdomain.com, IsAuditMode: false, Entra Device Name: N/A, Entra Device ID: N/A, Entra User ID: N/A, Original Source IP: N/A, Reason: Request is allowed since SPN is not in the policy
- Event ID 8: Kerberos request allowed. SPN: CIFS/SERVER01.yourdomain.com, Source IP: 10.10.10.10, UPN: user1@yourdomain.com, IsAuditMode: false, Entra Device Name: device1, Entra Device ID: 1234567-1234-5678-1234-123456789012, Entra User ID: user1@yourdomain.com, Original Source IP: 50.62.125.21, Reason: Request is allowed since traffic is from connector
- Event ID 8: Kerberos request allowed. SPN: CIFS/SERVER01.yourdomain.com, Source IP: 10.10.10.20, UPN: user1@yourdomain.com, IsAuditMode: false, Entra Device Name: N/A, Entra Device ID: N/A, Entra User ID: N/A, Original Source IP: N/A, Reason: Request is allowed since IP is in exclusions
- Event ID 8: Kerberos request allowed. SPN: CIFS/SERVER01.yourdomain.com, Source IP: 10.10.10.20, UPN: user1@yourdomain.com, IsAuditMode: false, Entra Device Name: N/A, Entra Device ID: N/A, Entra User ID: N/A, Original Source IP: N/A, Reason: Request is allowed since upn is in exclusions
- Event ID 16: Policy change detected, Private Access Sensor is running in audit mode with breakglass disabled.
- Event ID 17: Policy change detected, Private Access Sensor is running in enforcement mode with breakglass disabled.
- Event ID 17: Policy change detected, Private Access Sensor is running in enforcement mode with breakglass enabled.
As you can see, the most interesting events are the events with ID 7 & 8. Event ID 7 reflects a blocked request and Event ID 8 reflects an allowed request. So, they tell you exactly what is going on and tell you why something is happening.
They also show why it is very important to add the right exclusions in Entra to your SPN records which you have configured there.
If a request is coming from a source which is not from the connector and you do not have an exclusion made for it, the Kerberos request to that configured and protected SPN record will just be blocked, and you will not have access.
Inclusions and Exclusions
Now that you have seen why inclusions and exclusions are so important let me explain what you can configure and what it does.
Inclusions specify users who must use the Global Secure Access client in order to access the protected SPN. All other users not included in the list of inclusions can access the SPN without the client installed. You can only add UPN’s as inclusions.
Exclusions work in the opposite way, any user, device, or IP range configured as an exclusion can access the SPN without requiring the Global Secure Access client. All the other users or computers do need the client to access the SPN. You can add exclusions for an IP Address, IP address ranges and UPN’s.
These IP address ranges become very useful to exclude for example, your entire server VLAN to keep other services fully operational and keep protection for the SPN records you expose to your clients and users.
Next to using UPN’s as inclusions or exclusions it’s also possible to use on-premises usernames, it is supported, but only in the local policy JSON file.
Recommended is to use UPN’s instead of usernames for your on premises users and configure both synced and on premises UPN’s in the Entra portal on your protected SPN record.
UPN’s are case sensitive so configure them correctly otherwise your inclusion or exclusion won’t work correctly.
You can add inclusions and exclusions with the following steps:
- Open https://entra.microsoft.com/ >
- Open the Global Secure Access menu >
- Open Applications >
- Open the Quick Access application >
- Click on Network access properties >
- Click on Service principal name >
- Open the configured SPN record >
- Click on Enable Inclusions or Enable Exclusions or both, in case of exclusions you also need to specify if you want to enable it for an IP address or Users, you can only select one of the two >
- Click on Update
Now that you have enabled them, you can add the UPN for inclusions and IP address or UPN for exclusions in the main menu of the Service Principal names.
As an example to add an IP address range exclusion you can follow the next steps:
- Click on + Add Exclusion (IP and IP Range) on the SPN for which you have just enabled the feature >
- Select IP address range from the drop down menu >
- Fill in the range you want to exclude >
- Click on Add Exclusion >
- Click on Apply >
- Click on Save
After 5 minutes you exclusion will be active on your domain controllers.
Break glass mode
There is a failsafe available for the connector for ICE scenarios. You can set your Private Access Sensor in Break glass mode which will allow all requests to all SPN records configured in your Entra portal.
You can turn on Break glass mode with the following steps:
- Open https://entra.microsoft.com/ >
- Open the Global Secure Access menu >
- Open Connect >
- Open Connectors and sensors >
- Click on the Private Access sensors tab >
- Click on the Private Access sensor >
- Check the checkbox for Enable break glass mode >
- Click Save >
- Repeat the steps for every Domain Controller on which you have installed the Sensor
If your internet connection has failed and you need to give everyone access because access to Entra is not working anymore there is also a possibility to enable break glass mode on premises.
You can do this with the following steps:
- Open regedit as administrator >
- Navigate to the following registry path: HKLM\SOFTWARE\Microsoft\PrivateAccessSensor >
- Change the TmpBreakglass DWORD value from 0 to 1 >
- If needed restart your Private Access Sensor service >
- Repeat the steps on every Domain Controller on which you have installed the Sensor
Preventing Bypasses
Bypasses are the worst nightmare for administrators so I will also explain how to prevent any bypasses.
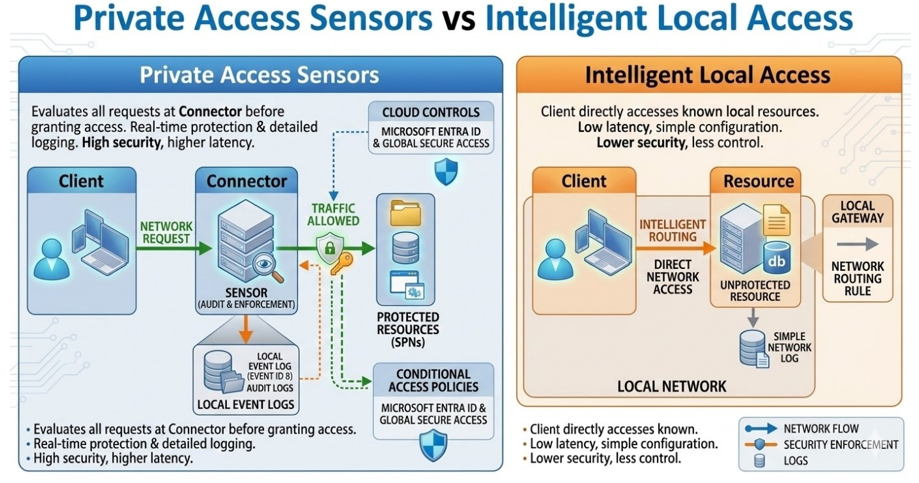
To fully prevent bypasses (for example a client accessing the SMB share directly using a cached Kerberos ticket), direct network access to the resource must be removed. This logic applies to all other services as well. Doing this ensures strict Zero Trust enforcement and guarantees that all traffic flows through the controlled network path via the Private Network Connector.
This requirement also explains why Intelligent Local Access (ILA) and Private Access Sensors are incompatible. ILA requires a direct line-of-sight to the resource for performance purposes, whereas Private Access Sensors rely on controlling the path through the connector to enforce Conditional Access. Although you cannot use ILA and PAS simultaneously for the same resource, you can use a mix of both features in your environment, use PAS to achieve zero trust when needed and use ILA when performance improvement is needed.
Tips & Tricks
When implementing Private Access Sensors, there are several important considerations to ensure the deployment works correctly and does not unintentionally disrupt existing services.
UPNs Are Case-Sensitive
When configuring inclusions or exclusions using UPNs, the value must match exactly. If the case does not match the actual UPN, the rule will not work as expected.
Infrastructure Systems Often Require Exclusions
Certain infrastructure components such as servers, backup systems, monitoring solutions, or service accounts may require exclusions to ensure internal processes continue functioning properly.
Use IP Range Exclusions Carefully
Excluding large IP ranges, such as entire server VLANs, can help maintain operational stability. However, doing so may reduce the security scope of the protection applied to your SPNs.
Install the Sensor on All Domain Controllers
Every domain controller in the environment should have the Private Access Sensor installed. If a domain controller does not run the sensor, Kerberos requests sent to that controller could bypass enforcement entirely.
Start Small When Protecting SPNs
Begin by protecting a single test service, such as a test SMB share. Once the configuration is validated and necessary exclusions are identified, protection can gradually be extended to production services.
Zero Trust Requires Network Segmentation
For a true Zero Trust implementation, clients should not have direct network access to protected resources. Access should only be possible through the Private Network Connector, ensuring all traffic is evaluated and controlled.
Break Glass Mode Should Only Be Used for Emergencies
Break glass mode temporarily disables enforcement and allows all Kerberos requests to protected SPNs. This mode should only be used during emergency scenarios such as outages or connectivity issues with Microsoft Entra.
Why Private Access Sensors and Intelligent Local Access cannot Be Combined
Private Access Sensors enforce Conditional Access by requiring traffic to flow through the connector. Intelligent Local Access improves performance by allowing direct connectivity. Because of these opposing requirements, both features cannot be used simultaneously for the same resource.
Key Takeaways
Private Access Sensors bring modern security controls to traditional on-premises authentication mechanisms.
Conditional Access enforcement for Kerberos
When a client requests a service ticket for a protected SPN, the sensor validates the request with Microsoft Entra before issuing the ticket.
Traditional services can adopt Zero Trust security
Services such as SMB shares that normally rely only on Kerberos authentication can now be validated against Conditional Access policies such as device compliance.
SPN configuration is required both on-premises and in Microsoft Entra
The SPN must exist in Active Directory and also be registered in the Quick Access Enterprise Application in Microsoft Entra.
Sensors must run on every domain controller
This ensures all Kerberos requests within the environment are inspected and evaluated.
Always start in audit mode
Running the sensor in audit mode first allows you to identify potential issues and necessary exclusions before enabling enforcement.
Event logs are critical for troubleshooting
Event ID 7 indicates a blocked Kerberos request, while Event ID 8 indicates an allowed request.
Conclusion
Private Access Sensors provide a powerful way to extend Zero Trust principles to traditional on-premises services. By validating Kerberos service ticket requests against Microsoft Entra Conditional Access policies, organizations can apply modern security controls to protocols that historically relied only on Active Directory authentication.
When implemented correctly, this feature allows services such as SMB shares to benefit from device compliance checks, identity verification, and Conditional Access enforcement. However, careful planning is required. Proper SPN configuration, installing sensors on all domain controllers, and validating behavior in audit mode are critical steps to ensure a successful deployment.
By combining Private Access Sensors with proper network segmentation and Conditional Access policies, organizations can significantly strengthen the security of their hybrid environments while maintaining compatibility with existing infrastructure.
Please feel free to leave a message if you enjoyed it, have questions, feedback or have found a mistake, I would really appreciate it!
Thanks for reading! I hope you enjoyed this blog post and hope to see you back soon.