13-02-2026 read time: 5 min.
Private Networks – Intelligent Local Access

Welcome back to a new blog post!
This time, I would like to talk about a feature of Private Access that is at this moment of writing still in preview and not yet generally available: Private Networks and Intelligent Local Access!
I will also explain how to enable it and how to check if it works like intended.
What is Intelligent Local Access?
In my first blog post I talked about Private Access as a VPN solution which can cause performance problems in combination with applications which have high I/O requirements. Microsoft has found a solution for that with Intelligent Local Access. It’s a bit of the same idea as RDP Shortpath with Azure Virtual Desktop.
This can be especially useful for applications that need a fast, low-latency connection or have high I/O demands, such as SQL servers or other database-heavy workloads.
The solution makes it possible to detect (with DNS probes) if your device is located within the corporate network and if that is the case, traffic is bypassed from the tunnel and routed directly to the resource. Authentication and conditional access policies (including MFA) are still evaluated by Microsoft Entra before access is granted. This prevents hairpinning and removes the additional latency introduced by cloud routing.
How ILA uses NRPT to optimize traffic
When you enable Intelligent Local Access, the GSA client automatically updates the Windows NRPT table based on where your device is. If you are on the corporate network, the FQDN of the private resource resolves to its internal IP, and traffic goes straight to the resource instead of through the tunnel. If your are outside the corporate network or there is a configuration problem, the NRPT entry is removed and traffic goes through the secure GSA tunnel as usual. This way, your apps get better performance without sacrificing security.
In the image below you can see the green dotted line (2) which is how the traffic is being routed without Intelligent Local Access and the blue dotted line (2) how the traffic flows with Intelligent Local Access. As you can see there are fewer hops, so lower latency between the client and the resource.
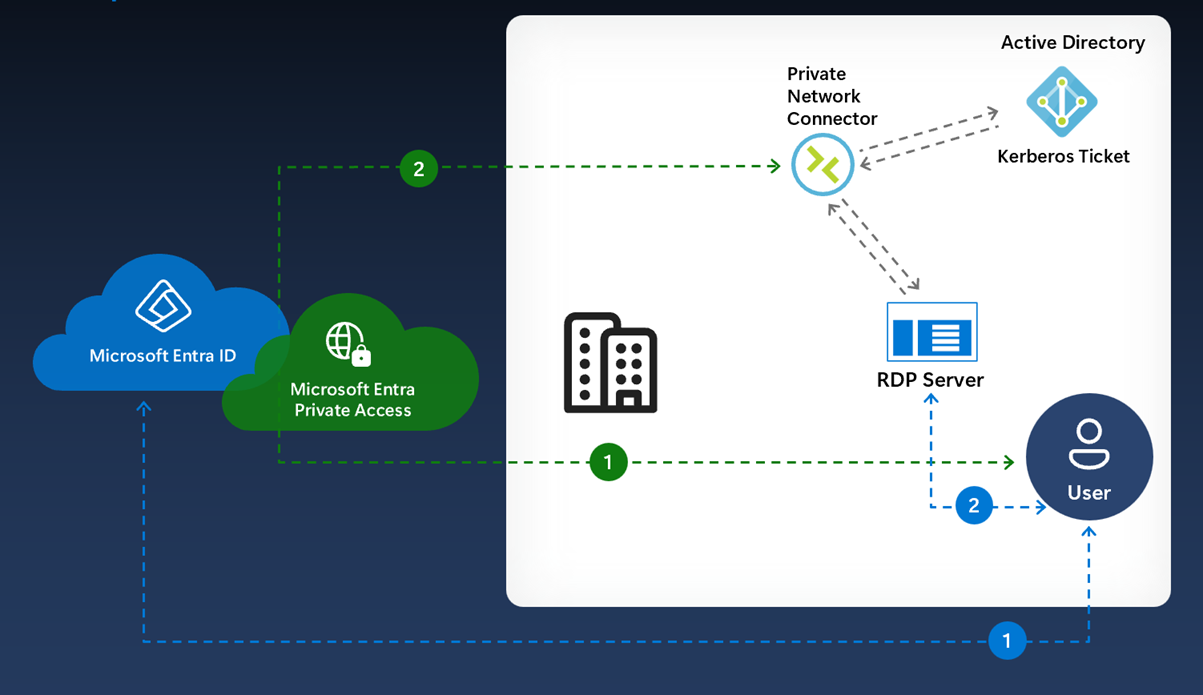
Source: Microsoft Learn
How to enable Intelligent Local Access?
So how do you enable Intelligent Local Access? I will show you!
First of all you need to find a resource(s), which can be anything as long as it is reachable for the client within the corporate network and is always online, for example your file server. But it can also be a set of resources which you can add by adding a network with an IP range (CIDR or IP to IP).
Then you need to add that as a private network in GSA.
- Open the Private networks
- Click on Add Private network
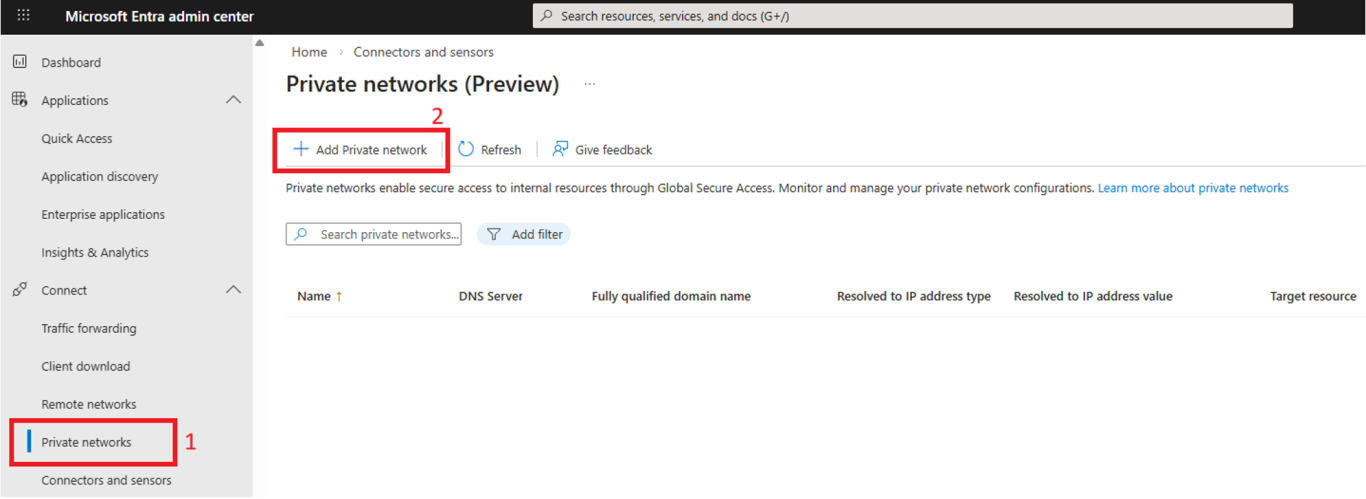
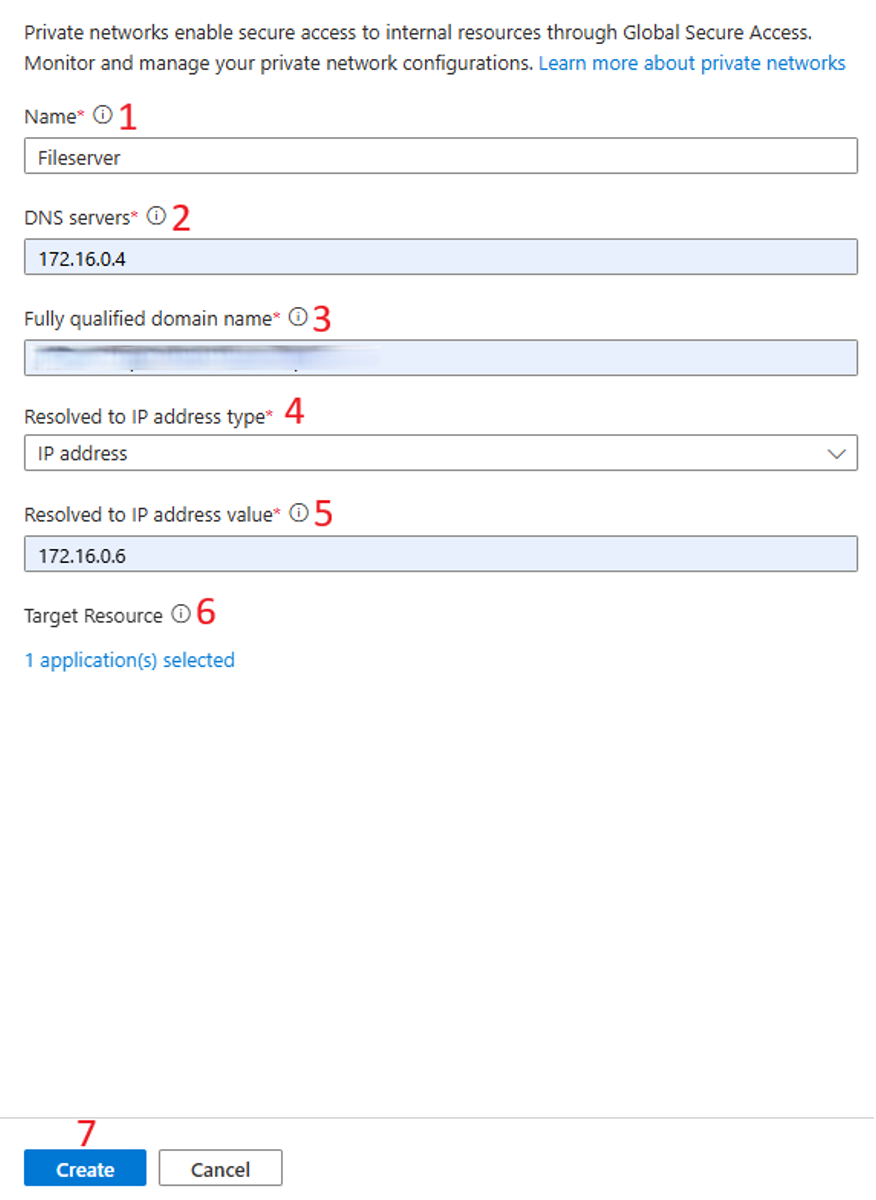
A new window opens where you can add your resource(s).
- Give a name to your private network, for example Fileserver
- Enter the IP address of your on-premises DNS server
- Enter the FQDN of your on-premises resource
- Choose the IP address type:
IP address
IP address Range (CIDR)
IP address range (IP to IP)
(In this example I use a single IP address) - Enter the IP address of your on-premises resource
- Select the Enterprise Applications for which you want to activate Intelligent Local Access
- Click Create
Make sure you fill in the correct IP address and FQDN of the internal resource because otherwise all the traffic will still be tunneled.
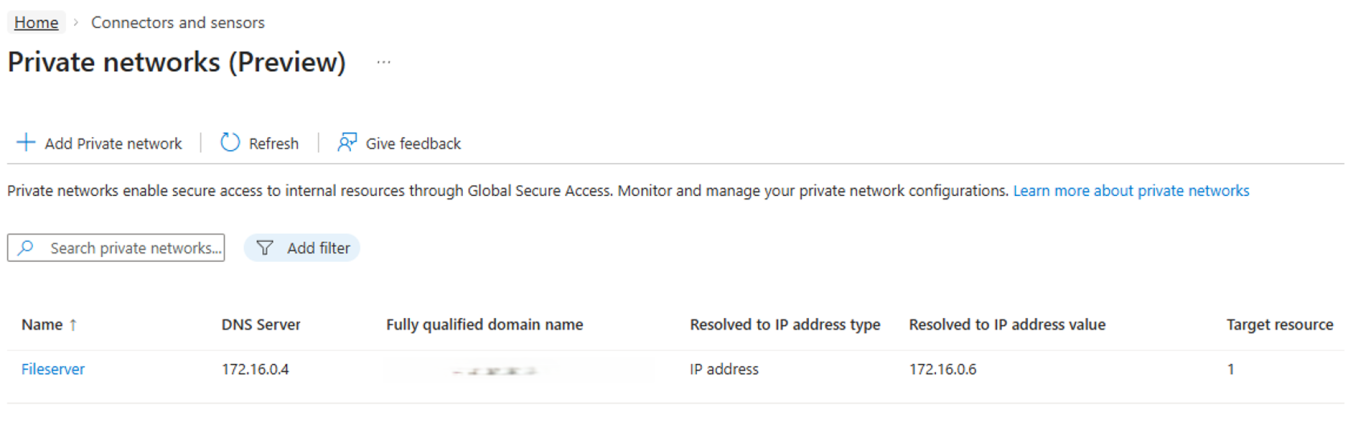
And here is your result:
Let’s check if it works!
Now let’s get over to the client and check if the configuration we just made works as intended.
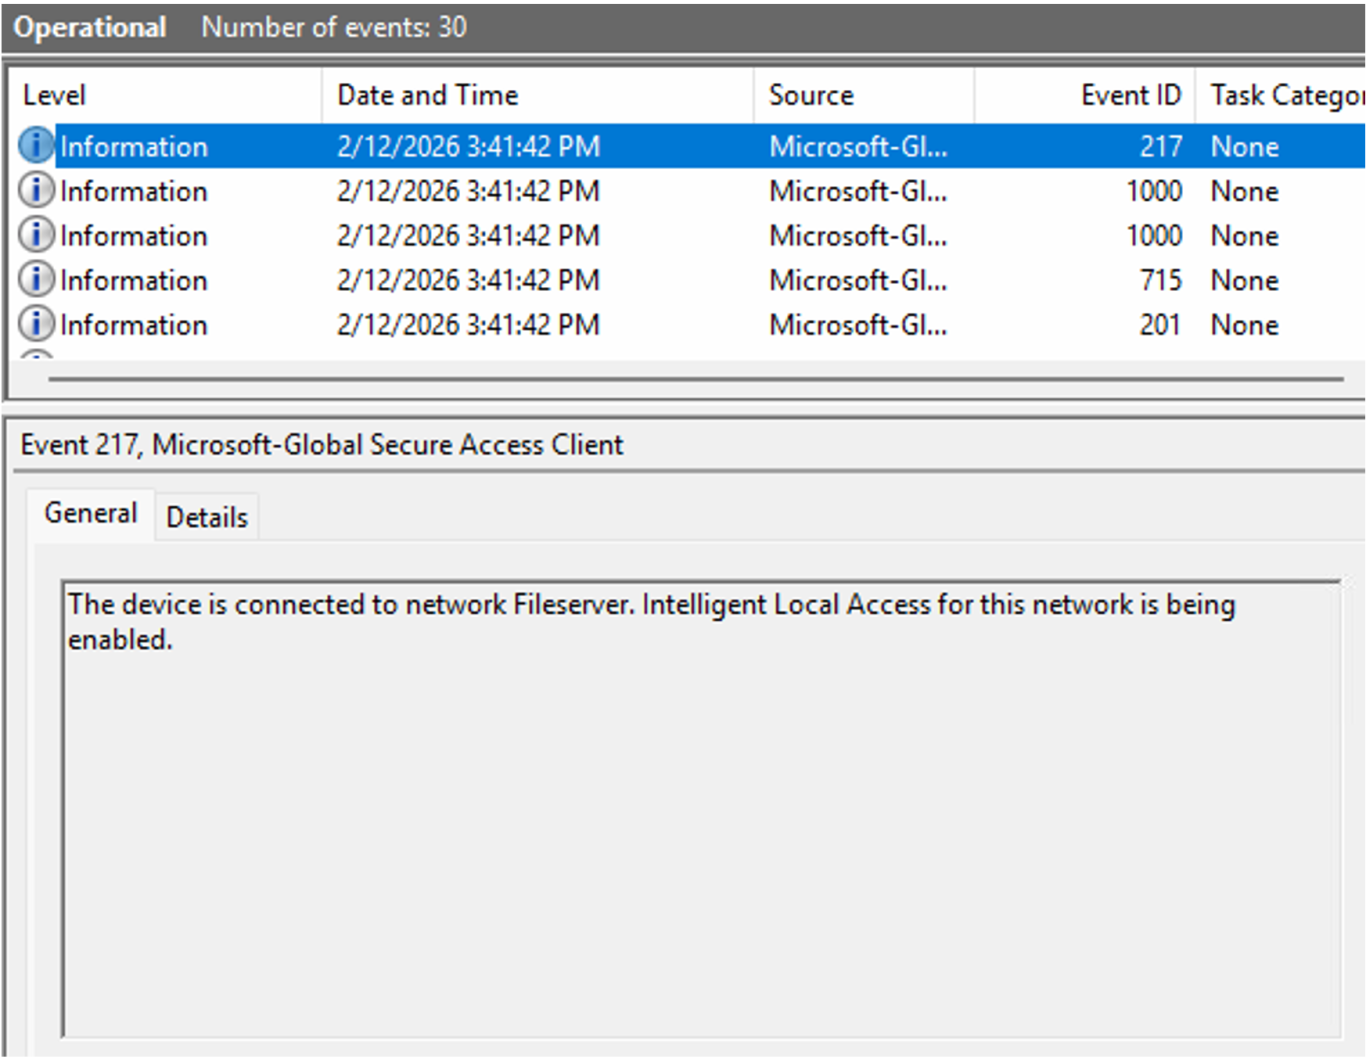
Let’s first have a look at the event log.
Open event viewer and navigate to:
Applications and Services Logs
> Microsoft
> Windows
> Global Secure Access Client
> Operational
Look for the event with ID 217.
As you can see, the Fileserver gets detected and Intelligent Local Access gets enabled.
If for some reason you get Event ID 218 with description: “The device is disconnected from network Fileserver. Intelligent Local Access for this network is being disabled.” in your event log, its usually means that there is a configuration issue. Please check your settings and ensure the DNS server, FQDN or IP address are correct.
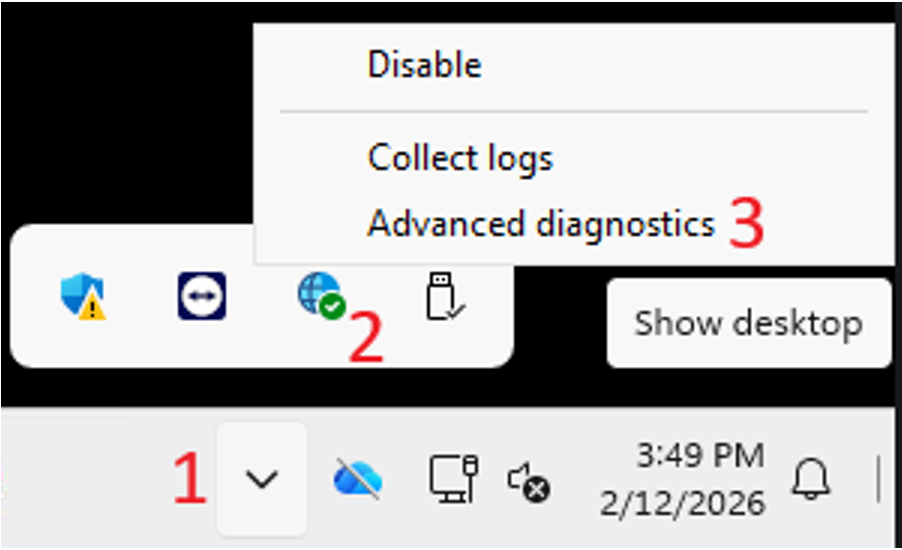
Now let’s have a look at the Global Secure Access Client and see what the traffic logs have to say.
- Open your system tray
- Right-click on the GSA Client
- Click on Advanced diagnostics
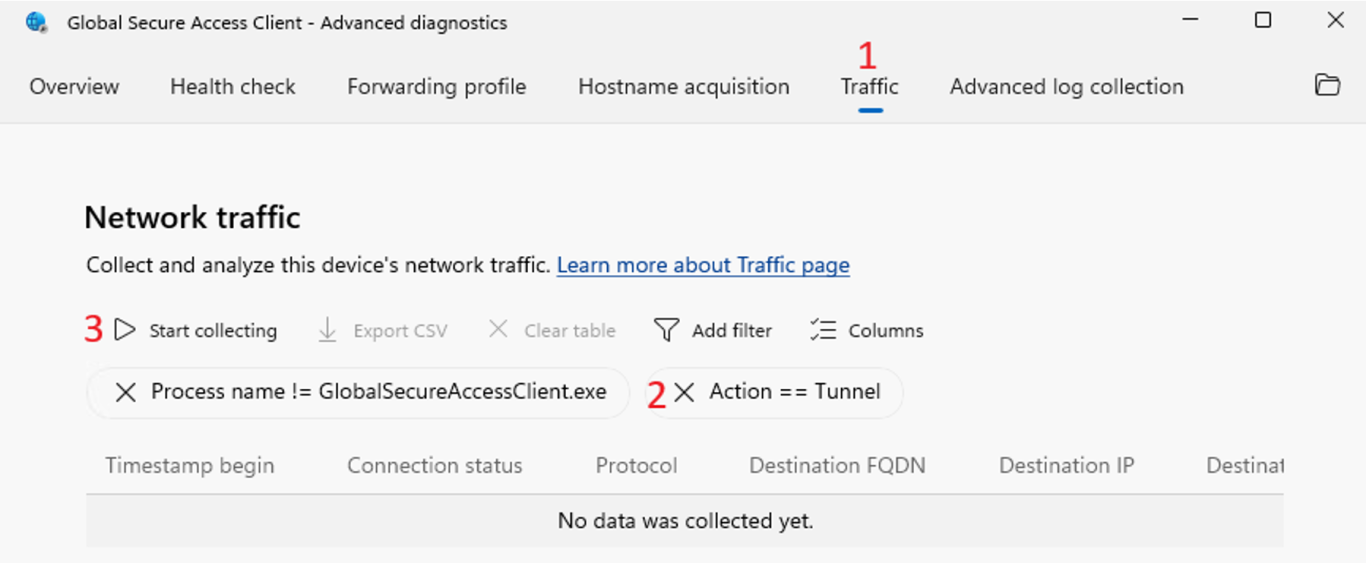
The troubleshooting tool of the GSA Client opens.
- Click on the Traffic tab
- Remove the Action filter with a click on the cross sign
- Click on Start Collecting
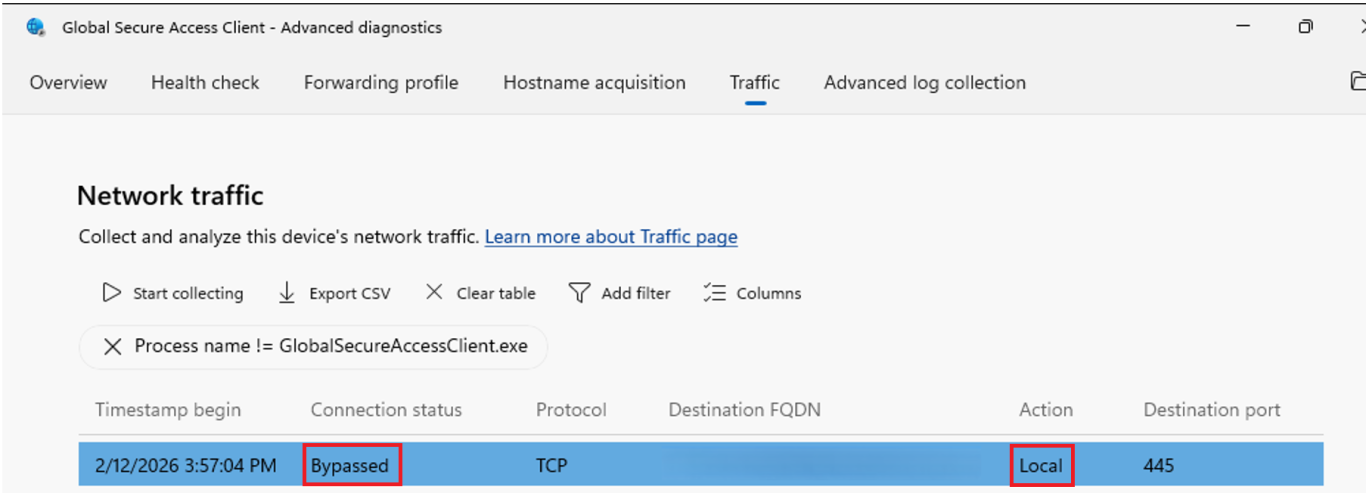
The next thing you need to do is start generating some traffic to the resource for which you enabled Intelligent Local Access. In my example it will be opening a file share.
After you generated the traffic, you can click on Stop collecting.
As you can see in the image below, the Connection status is Bypassed and the Action is Local, exactly what you want to see to confirm that Intelligent Local Access is working as expected.
Summary
In this post I explained what the benefits are with enabling Intelligent Local Access and that it can enhance the performance of your applications when working from a corporate network. Next, I explained how you can enable Intelligent Local Access by adding a Private Network and enabling it for selected Private Resources. And lastly, I explained how you can check if the Intelligent Local Access feature works as intended.
Please feel free to leave a message if you enjoyed it, have questions, feedback or have found a mistake, I would really appreciate it!
Thanks for reading! I hope you enjoyed this blog post and hope to see you back soon.