09-04-2026 read time: 10 min.
Microsoft Entra Internet Access

Hi! And welcome back to another blogpost about GSA. Currently I’m actively testing and implementing Microsoft Entra Internet Access in different scenarios. So, I thought it would be nice to spend a post about it. How do you configure it, why do you need to configure it that way and what do you need to keep in mind when configuring it?
I am going to cover everything in a series of posts because otherwise it will be way too big for a single post. So, for this occasion I will talk about the basics of Microsoft Entra Internet Access.
In my experience so far, understanding how profiles, policies, and Conditional Access work together is key to a successful implementation.
I will cover the following parts:
- What is Microsoft Entra Internet Access
- Licensing
- Traffic Forwarding Profile
- Policies
- Baseline Profile
- Security profiles
- Assignment
- Global Secure Access Token
- Override Profile & Policy
What is Microsoft Entra Internet Access
Microsoft Entra Internet Access can be seen as a modern Secure Web Gateway (SWG), but with significant advantages over traditional on-premises solutions. One of the biggest benefits is that you don’t need an on-premises infrastructure anymore and because it is an Entra service it works from anywhere in the world, not only within your corporate network. This removes the requirement for a client from routing Internet traffic via a VPN to an on-premises Secure Web Gateway. This also reduces the load on your corporate WAN link. Your client can now just contact the Microsoft’s Global Secure Access (GSA) secure edge network with the GSA client and the Internet traffic gets filtered by Entra based on your configured policies.
And because it is integrated with all the other Entra services it brings also all these benefits such as Conditional Access, Purview, Governance etc.
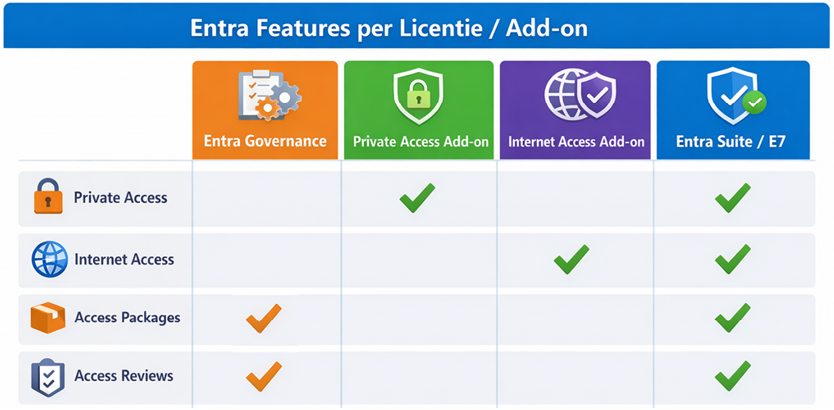
Licensing
To enable Internet Access you need Microsoft Entra ID P1 (or P2 depending on features) as a prerequisite, along with one of the following licenses:
- Internet Access add-on
- Entra Suite
- Microsoft 365 E7 (which includes Entra Suite and Global Secure Access capabilities)
I recommend assigning these licenses to users through a group.
Traffic Forwarding Profile
After you acquired the required licenses, you are able to enable the Internet access profile within your Traffic forwarding profiles.
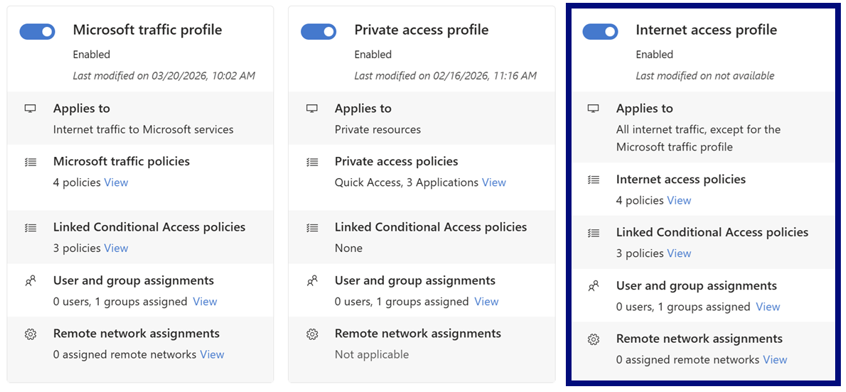
After you enabled the traffic forwarding profile, you need to assign it to the users for which you want to enable the profile. You can choose between All Users, one or more group assignments or one or more user assignments. My advice is to use the same group you used for your license assignment for your profile assignment.
Policies
At this moment of writing there are 8 types of policies available to configure:
- Cloud firewall policies: Monitor network traffic based on rules
- Web content filtering policies: Filter access to websites based on category or reputation
- Content policies: Control over uploading and downloading of files
- Prompt policies: Security and governance when using generative AI tools
- Threat Protection policies: Detection and blocking of malware and phishing (currently 3rd party security providers only, Purview as of May/June 2026)
- Data loss prevention policies: Prevents sensitive data from being shared or leaked (currently only Netskope's Advanced Threat Protection integration, Purview as of May/June 2026)
- TLS Inspection policies: Inspection of encrypted (HTTPS) traffic
- Threat Intelligence policies: Realtime protection based on worldwide available threat intelligence information
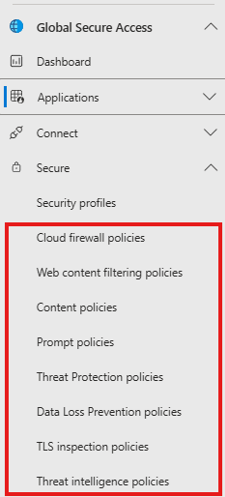
In later blog posts I will dive deeper into these policies and what you can do with them.
Baseline Profile
The Baseline profile acts as a catch-all profile and is applied to all Internet Access sessions when no other profile matches. There is no need to assign this profile to users or groups.
You can create all available policy types and bind them to the Baseline profile. By default, the Baseline profile has the lowest priority (shown as 65000 in the portal), which means that every other profile you create and assign takes precedence over it.
You can consider this profile as a fallback profile.
Security Profiles
Security Profiles is where you create your profiles with different type of policies for different type of users.
As an example, you want your Commercial and Social Media department to be able to access LinkedIn/FaceBook/Instagram but you don’t want any other users with access to that kind of websites. With security profiles you can do that.
In Security profiles you add all the policies you want to be effective for a specific group of users. But there are a few limitations to it. You cannot add unlimited policies of each type to a profile.
The maximum number of policies per Security Profile is this:
- Cloud firewall policies: 1
- Web content filtering policies: Multiple (subject to overall system limits)
- Content policies: 1
- Prompt policies: 1
- Threat Protection policies: 1
- Data loss prevention policies: 1
- TLS Inspection policies: 1
- Threat Intelligence policies: 1
The maximum number of policies and profiles in your tenant is this:
- Total policies per tenant: 1,000
- Security profiles per tenant: 256
- Total rules per tenant: 1,000
- TLS inspection policies: 100
- TLS inspection rules: 1,000
- TLS inspection destinations: 8,000
Policies are evaluated in a defined hierarchy, where some policy types (such as firewall and TLS inspection) are evaluated before others like web filtering and data protection policies.
Policy order: (1) Cloud firewall > (2) TLS inspection > (3) Web content filtering > (4) Threat intelligence > (5) File Type > (6) Data loss prevention > (7) Third-party.
(Exact evaluation order may vary depending on configuration.)
The final limitation is that only one security profile will be evaluated per session; profiles are not cumulative or stacked.
<<UPDATE 13-04-2026: While only one effective profile is enforced per session, all applicable security profiles are evaluated and their rules are combined into a single effective policy. When settings conflict, the rule from the profile with the highest priority is enforced.>>
Assignment
The assignment of security profiles needs to be done with conditional access policies, Hopefully Microsoft will simplify this in the future but at the moment this is the way how it needs to be done.
Just create a conditional access policy and under Assignments → Users or agents (Preview) pick your user group to which you want to assign the Security Profile to.
Next, under “Target resources”, select “All internet resources (Global Secure Access)”.
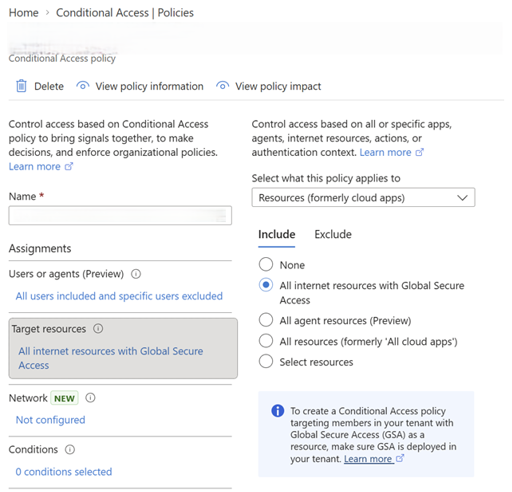
The last step involves choosing the security profile we want to assign, click on the “Session” tab, scroll down in the menu that appears and check “Use Global Secure Access security profile”.
Pick your desired profile and click on “Select”.
Next click on Save.
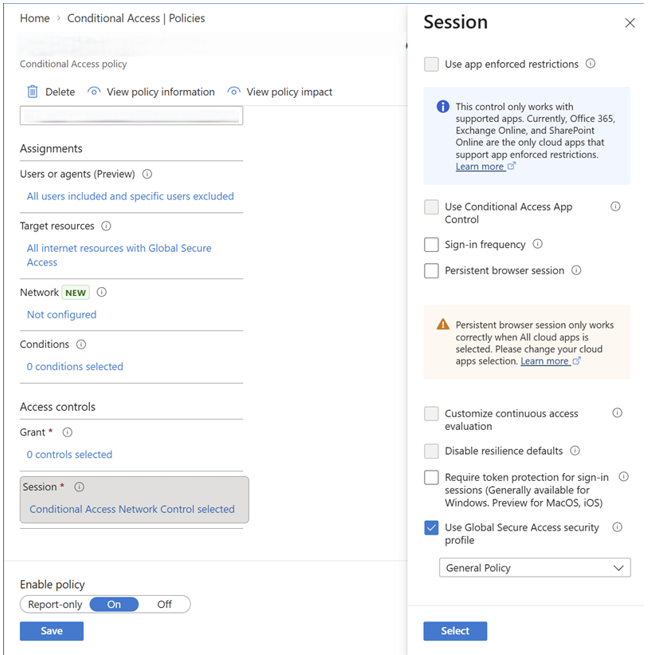
You don’t have to do any other settings in this policy, this is enough.
The next time the Secure Access token refreshes, your users will receive the Internet Access Security Profile.
Global Secure Access Token
The token where your security profile information will be shipped in is the Global Secure Access Token.
The information of the token will be absorbed by the Global Secure Access client and as traffic is processed, the GSA client enforces policy decisions based on the token. And based on that information you can visit the website or you will get a denied message like this:

Source: Microsoft Learn
The token is not refreshed on every request; instead, it is refreshed every 60 to 90 minutes. So it can take a while before a change is active.
Override Profile & Policy
In certain situations, you may want to temporarily allow traffic or actions that are normally blocked by your security policies. This can be achieved by creating an override Security Profile.
An override profile is not a separate feature, but simply a Security Profile configured with more permissive policies and higher precedence. By assigning this profile a higher precedence (based on priority and assignment), it will take effect instead of the standard blocking profile.
To assign this profile, you must use a Conditional Access policy, similar to how other Security Profiles are assigned.
When a user is targeted by the override profile, the allowed actions defined in that profile will take precedence over the restrictions in lower-priority profiles.
A recommended approach is to combine this with Access Packages, so that users can request temporary override access that automatically expires after a defined period.
Important: Since a single Security Profile is evaluated per session, your override profile must include all required policies. Otherwise, you risk unintentionally removing protections or allowing unintended access. <<See the update in the Security Profiles section!
Conclusion
Microsoft Entra Internet Access is a powerful step towards a modern, cloud-based Secure Web Gateway. It removes the need for traditional on-premises solutions and VPN-based routing, while still giving you a lot of control over how Internet traffic is handled.
As discussed in this post, the most important part is understanding how Traffic Forwarding Profiles, Security Profiles and Conditional Access all work together. Especially the fact that only one Security Profile is evaluated per session is something you really need to keep in mind when designing your setup. <<See the update in the Security Profiles section!
The configuration might feel a bit complex at first, mainly because of the way assignments are handled through Conditional Access. But once you understand the logic behind it, it becomes much easier to work with and also very flexible.
Features like the Baseline Profile and the option to create override profiles give you the ability to handle both standard scenarios and exceptions in a controlled way.
In the next post, I will go deeper into the different policy types and show how to configure them in real-world scenarios.
Please feel free to leave a message if you enjoyed it, have questions, feedback or have found a mistake, I would really appreciate it!
Thanks for reading! I hope you enjoyed this blog post and hope to see you back soon.